Creating Alexa Skills for IoT and Nodemcu - Part 3 Alexa and Lambda

Reading Nodemcu IoT Data with Alexa
This is the final post in a series aimed at connecting Alexa to a Nodemcu that is collecting temperature and humidity data.
Overview
I recommend reviewing my first post in this series, so you can understand the game plan... but here's the short version. We will create and configure three separate services in AWS. An Alexa Skill for voice commands, a AWS Lambda function that will act as a middle man, and AWS IoT for storing the current state of the Nodemcu sensors.
DISCLAIMER: This guide uses a work around to allow Nodemcu to communicate directly with AWS IoT. The work around uses API keys that will be written in cleartext on the Nodemcu. Proceed at your own discretion.
Goals
- Create a AWS Lambda function that will collect the Nodemcu data that was sent to AWS IoT
- This will be written in Python
- Create an Alexa Skill to read data gathered by the Lambda function
- Setup a security policy to provide Lambda access to Thing Shadow state in AWS IoT
Prep
I considered showing how to setup the appropriate accounts on AWS and Amazon Developer, but it seems there are plenty of good resources to show how to do that. Put your google-fu skills to work or take a wild stab at it.
- A Nodemcu sending data to AWS IoT Thing Shadow Part 2 - AWS IoT
- An AWS Account from creating Lambda functions (free tier allows 1M messages a month)
- This would have been setup to complete Part 2
- An Amazon Developer account for creating Alexa Skills
- (Optional) Echo Dot - http://amzn.to/2EeGNaP
- You can test everything using the Alexa Skills Kit or Echosim.io if you don't have an Echo Dot
You can find the parts and components I used to build the sensor in Part 2 - AWS IoT
Steps - Alexa Skill
In the previous post, we configured our Nodemcu to send temperature and humidity data to an AWS IoT Thing Shadow. Our next step is to get that data to a web service that Alexa can access and read it. Amazon recommends using AWS Lambda.Creating the Skill
- Open the Developer Console at https://developer.amazon.com > Alexa > Alexa Skills Kit - Get Started
- Add a New Skill > Ensure Custom Interaction Model is selected
- Create a Skill Name such as Sensor Reader
- Note that if you intend on releasing a skill for public use this Name will be search-able by other Alexa users.
- Create an Invocation Name such as sensor reader
- The Invocation Name is how you will trigger the Skill when giving commands to Alexa such as "Alexa, ask sensor reader what the temperature is in the office"

- Select Save and copy the Application Id to your text editor for use in later steps
- Select Next
The Interaction Model
I want the skill to tell me the temperature and humidity of a specific room. To do this we need to build an Interaction Model that tells the Skill how to respond.
If you would like a better understanding of how Interaction Models work, an in depth reference is found at https://developer.amazon.com/docs/custom-skills/custom-interaction-model-reference.html
Here is a simple explanation of the parts in the Interaction Model:
Utterance: The words you speak to Alexa "Alexa, ask Sensor Reader what is the temperature in Office"
Intent: The Alexa Skill that Alexa determines will fulfill your request/utterance
Slot Type: Essentially the Key in a key : value pair
Creating the Intent Schema
- Paste the following JSON into the Intent Schema field
- Paste the following JSON into the Intent Schema field
{
  "intents": [
    {
      "intent": "AMAZON.CancelIntent"
    },
    {
      "intent": "AMAZON.HelpIntent"
    },
    {
      "intent": "AMAZON.StopIntent"
    },
    {
      "slots": [
        {
          "name": "room",
          "type": "LIST_OF_ROOMS"
        }
      ],
      "intent": "getTemperature"
    },
    {
      "slots": [
        {
          "name": "room",
          "type": "LIST_OF_ROOMS"
        }
      ],
      "intent": "getHumidity"
    }
  ]
}
{
"intents": [
{
"intent": "AMAZON.CancelIntent"
},
{
"intent": "AMAZON.HelpIntent"
},
{
"intent": "AMAZON.StopIntent"
},
{
"slots": [
{
"name": "room",
"type": "LIST_OF_ROOMS"
}
],
"intent": "getTemperature"
},
{
"slots": [
{
"name": "room",
"type": "LIST_OF_ROOMS"
}
],
"intent": "getHumidity"
}
]
}
Creating Slot Types
In my example I have Nodemcu's in 3 rooms. If you are using just one Nodemcu you can change to values below to fit your needs.
- Select Add Slot Type and enter the following

- Select Add Slot Type and enter the following
Creating Sample Utterances
The utterance determines which intent will be triggered. In simple terms, the utterance will determine whether Alexa will read the temperature or the humidity.
- In the Sample Utterances field enter the following

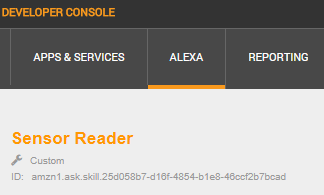
- Copy the Skill ID found at under your Skill name, to your text editor
- Leave this web tab open. We need to open AWS IAM to setup a user for Lambda
- In the Sample Utterances field enter the following
- Copy the Skill ID found at under your Skill name, to your text editor
- Leave this web tab open. We need to open AWS IAM to setup a user for Lambda
Steps - Lambda User
Lambda will require an account to authenticate and interact with the IoT Thing Shadow. I will set the policy to allow the Lambda function to access the Shadow state of all my Things in IoT.
- Open IAM from the AWS Console > Policies > Create Policy
- Service: IoT
- Actions: GetThingShadow
- Resources : All resources
- If you have one Thing you can set the policy to allow access to only that Thing
- Select Review Policy
- Name the policy
- I used lambda_getAllThingShadows
- Create policy
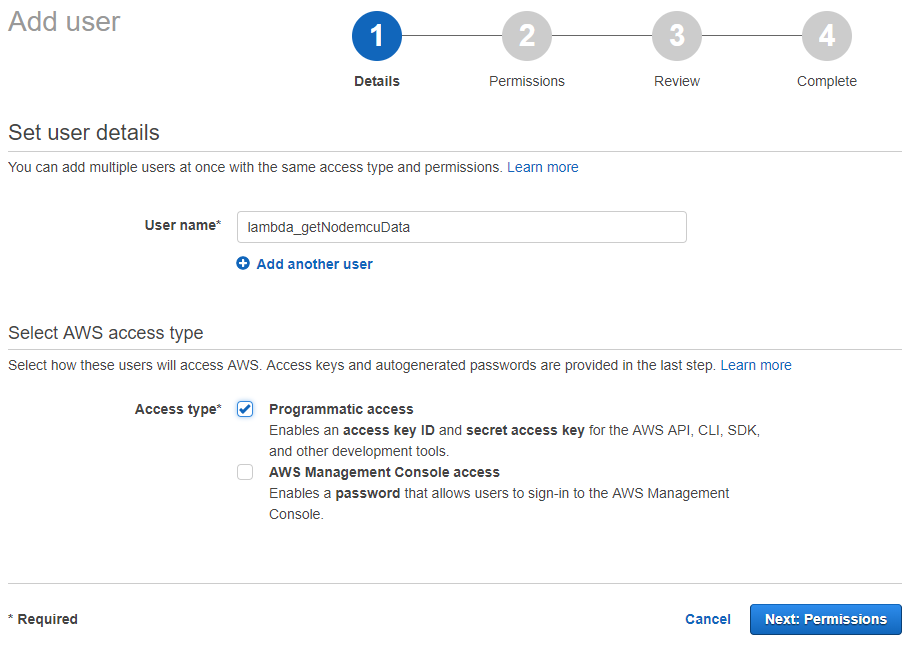
- Now go to Users
- Add User > Name the User > Select Programmatic Access > Next: Permissions
- Attach existing policies directly
- Search for your policy > Check the box next the policy > Next: Preview
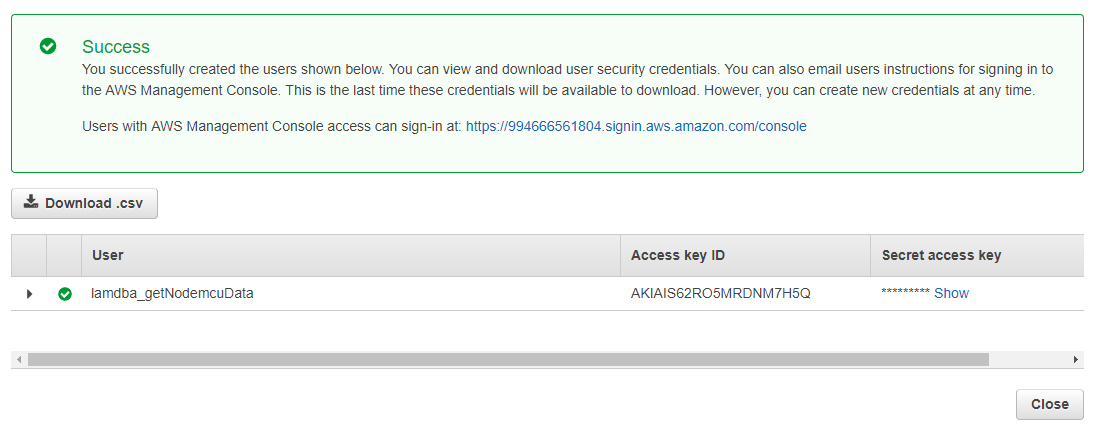
- Create User
- Copy the the Access key ID and Secret access key to your text editor
Steps - AWS Lambda
I will be honest, coming from a data center infrastructure background, AWS Lambda is blowing my mind! The concept of server-less and container-less programs is amazing.
Alright, let's create a some Lambda functions in Python to read the state of the Nodemcu Thing Shadow.
- Open the AWS Console https://console.aws.amazon.com/
- Search Lambda and select Lambda
- Select Create Function > Author from Scratch (because that's how we roll)
- Enter a Name, I used getNodemcuData
- In Runtime select Python 3.6
- In the Role section, select Create a custom role
- IAM Role: lambda_basic_execution
- Policy Name: Create a new Role Policy
- Allow

- You will be redirected back to Author from scratch
- Role: should be set to Choose an existing role
- Existing Role: lambda_basic_execution
- Create function
- Copy the function ARN (Amazon Resource Name) to your text editor
- In the Designer, assign Alexa Skills Kit as the trigger
- In the Configure triggers pane, paste the Skill ID from the Alexa Skill we created.
- Select Add
- Open the AWS Console https://console.aws.amazon.com/
- Search Lambda and select Lambda
- Select Create Function > Author from Scratch (because that's how we roll)
- Enter a Name, I used getNodemcuData
- In Runtime select Python 3.6
- In the Role section, select Create a custom role
- IAM Role: lambda_basic_execution
- Policy Name: Create a new Role Policy
- Allow
- You will be redirected back to Author from scratch
- Role: should be set to Choose an existing role
- Existing Role: lambda_basic_execution
- Create function
- Copy the function ARN (Amazon Resource Name) to your text editor
- In the Designer, assign Alexa Skills Kit as the trigger
- In the Configure triggers pane, paste the Skill ID from the Alexa Skill we created.
- Select Add

- Select Save
- Scroll down to Environment variables
- Input the secret key id and access key that you copied from the User you created in IAM
- Key: SECRET_KEY | Value: secret key
- Key: ACCESS_KEY | Value: your access key id
- Select Save
- Key: SECRET_KEY | Value: secret key
- Key: ACCESS_KEY | Value: your access key id
Lambda - Python Code
We will use the AWS boto3 Python module. Boto3 has a simple client function to allow a connection to the AWS IoT Thing Shadow(s). We will also use Lambda's built in key/value encryption feature to securely add your API access key and access secret.
Paste the following into the Lamba programming pane
Paste the following into the Lamba programming pane
import boto3
import os
import json

def lambda_handler(event, context):

    # Determine which Thing Shadow to read
    room = event["request"]["intent"]["slots"]["room"]["value"]

    if room == "bedroom":
        thingShadow = "node_bedroom"

    elif room == "kitchen":
        thingShadow = "node_kitchen"

    elif room == "office":
        thingShadow = "node_office"


    # Connect to AWS IoT REST API
    client = boto3.client(
        'iot-data',
        region_name='us-east-1',
        aws_access_key_id=os.environ['ACCESS_KEY'],
        aws_secret_access_key=os.environ['SECRET_KEY']
    )


    # Read the current data in the Thing Shadow
    shadowState = client.get_thing_shadow(thingName=thingShadow)

    streamingBody = shadowState["payload"]
    shadowJSON = json.loads(streamingBody.read())


    # Determine temperature or humidity
    intent = event["request"]["intent"]["name"]

    if intent == "getTemperature":
        dataType = "temperature"
        description = " degrees"

    elif intent == "getHumidity":
        dataType = "humidity"
        description = " percent"


    # Create the response that will be sent to Alexa
    alexaString = str(shadowJSON["state"]["reported"][dataType]) + description


    # Send the response back to Alexa
    return {
        "version": "1.0",
        "response": {
            "outputSpeech": {
              "type": "PlainText",
              "text": alexaString
            }
        }
    }
Steps - Final Alexa Configuration
Its about to get real! We need to connect this Skill to the Lambda function we created.
- Go back to the Alexa Skill Kit... you should still have that tab open right?
- In Configuration, select AWS Lambda ARN
- In Default, paste the Lambda ARN
- The remaining settings can be left as defaults
- Select Next

Testing
Okay. That was not too bad. Let's see the fruits of our labor.
- You should have the Test screen up
- Set Testing to Enabled for you account

- In Service Simulator you should see the Lambda ARN you setup in Configuration
- Now we can simulate speaking to Alexa and triggering our Lambda function
- If all goes well, this is what you should see

The tests are successful. Try asking for the humidity also.
Alexa Setup for your Echo Dot
- Open the Alexa App on your smart phone/device
- Go to Skills > Your Skills
- Now press on the Dev Skill tab you should see the Skill you created
If the skill is there you are ready to interact with your Echo device

Bada Bing... Bada Boom.
Result
This has been a great project to get my feet wet with Alexa, AWS IoT, and AWS Lambda. There ideas are flowing at the moment.
Next Time
I want to get more in depth into the features that Lambda can provide to Alexa. I'd like to get some historical data going and see if I can use Alexa to give me a useful review of the Nodemcu sensors through out my house.


Nicely covered. Since I am new to all this, I found another tutorial just for the Alexa Skills part that helped me: https://www.youtube.com/watch?v=4SXCHvxRSNE
ReplyDeleteBut thanks to your excellent series, I now have my own echo dot that I can ask for the outside temperature or humidity!!!